4-134 L Engine Service Standards - CJ-3A
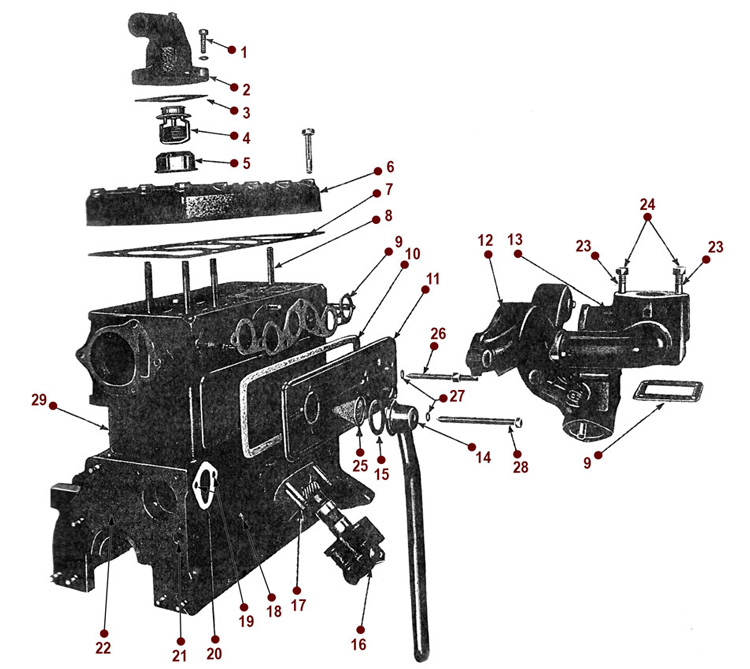
4-134 L engine illustration shown for reference only - click here to shop for these parts by interactive diagram

Looking for 4-134 L Head Engine parts for your vintage Willys or Jeep? Search Engine by Category or by Diagram
General:
An engine tune-up should be performed each 6,000 miles, or at the end of each 250 hours of off-the-road use. (C-1, p19)
Battery:
Clean and Check Battery. Load test the battery - Connect a voltmeter across the battery. Run the starting motor for 15 seconds. If the voltage does not drop below 5 volts on a 6-volt battery, or 10 volts on a 12-volt battery, the battery is satisfactory. (C-2 (f), p 19)
Spark Plugs:
Cleaning and adjusting. Clean, inspect and gap spark plugs. Do not install spark plugs until completion of compression tests. (C-3, p 19)
Torque Cylinder Head and Manifold:
Torque the cylinder head bolts with a torque wrench to 60-70 lb-ft. (8,3 a 9,7 kg-m). Torque all manifold attaching nuts evenly to 30 to 35 lb-ft. (4,1 a 4,8 kg-m). (C-4, p20)
Check Fuel Pump:
The minimum and maximum allowable pressures are 2 1/2 to 3 3/4 lb. Also check the condition of the vacuum line rubber connector. (C-14, p22)
Adjust Carburetor:
First, start the engine and allow it to reach operating temperature.
A.) Set the idle speed adjusting screw. Do not set the engine idle below 600 rpm.
B.) Adjust the idle mixture adjusting screw to provide smooth idle. For richer mixture, turn the screw out; for leaner mixture, turn the screw in. Normal opening is 3/4 to 1 3/4 turns. (C-16, p23)
Check Fan Belt:
Inspect fan belt for serviceability and proper tension. Correct tension is obtained when thumb pressure midway between pulleys causes the belt to flex 1/2" (C-16, p23)
Engine Removal:
• Drain the cooling system by opening the drain cocks at the bottom of the radiator and lower right side of the cylinder block.
• Disconnect the battery at the positive terminal to avoid the possibility of a short circuit.
• Remove both the upper and lower radiator hoses, and the heater hoses if so equipped.
• Disconnect the fuel line at the fuel pump and the windshield wiper hose.
• Disconnect the carburetor choke and throttle controls.
• Remove the starting motor cables and the starting motor.
• Disconnect the generator wires.
• Disconnect the oil pressure sender unit and temperature sender unit wires at the units. (D-5, p29)
• Disconnect the exhaust pipe from the exhaust manifold.
• Remove the two nuts and bolts from each front engine support and remove the supports.
• Remove the bolts which attach the flywheel bell housing to the engine. (D-5, p28)
Install Oil Pan:
Apply a thin coat of gasket paste on the oil pan. Place the new oil pan gasket in position. Set the oil pan in position on the cylinder block and install the oil pan. Torque the attaching bolts 9 to 14 lb-ft. (1,2 a 1,9 kg-m.). Install the oil pan drain plug and gasket and tighten the plug securely. (D-89, p49)
Install Spark Plugs:
Clean and adjust the spark plugs, setting the electrode gaps at .030" (0,762 mm.) Torque the spark plugs 25 to 33 lb-ft. (3,4 a 4,6 kg-m.) - (D-91, p50)
Final Operations / Notes:
Note: It is advisable to check the tightness of the head bolts again after 500 to 600 miles of normal operation. (D-95, p50)
Valve Adjustment Procedure:
The valve tappets are adjusted by turning the adjusting screw in or out of the tappet as necessary to obtain the proper clearance. Where special wrenches can be obtained, they should be used to facilitate the adjustment. The proper clearance is .016" (0,406 mm.) between the end of the adjusting screw and the bottom of the valve. (D-98, p50)
Check Valve Timing:
To check the valve timing, carefully set the intake valve adjustment for No. 1 cylinder to .020" (0,508 mm.) between the tappet and the valve stem. Rotate the crankshaft clockwise until the piston in No. 1 cylinder is ready for the intake stroke. The intake valve opens 9° before top center (BTC). Note the distance between the "TC" and "5°" marks on the indicator on the timing gear cover and estimate the 9° before top center position. With the crankshaft in this position, timing is correct if the tappet is just tight against the intake valve stem. Do not overlook resetting the tapped adjustment to the correct running clearance. (D-99, p51)
* Excerpt from the Service Manual for Universal Jeep Vehicles
