T-90 Transmission - CJ-3A
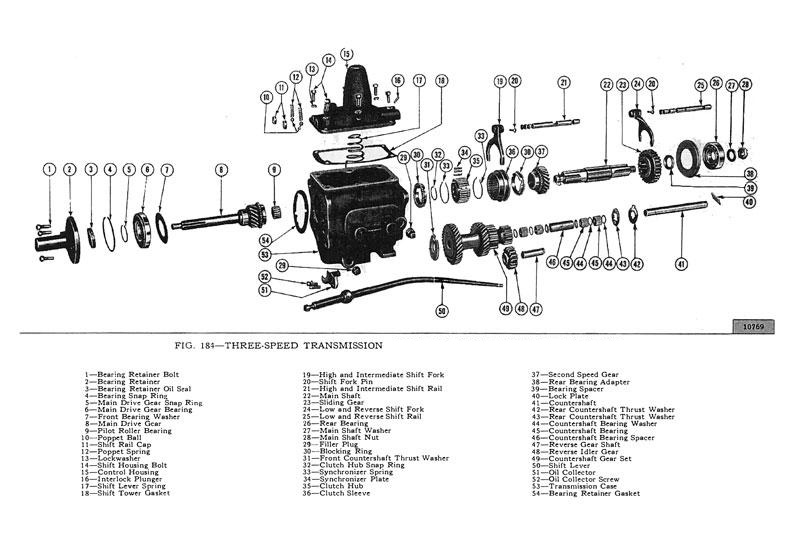
T90 transmission illustration shown for reference only - click here to shop for these parts by interactive diagram
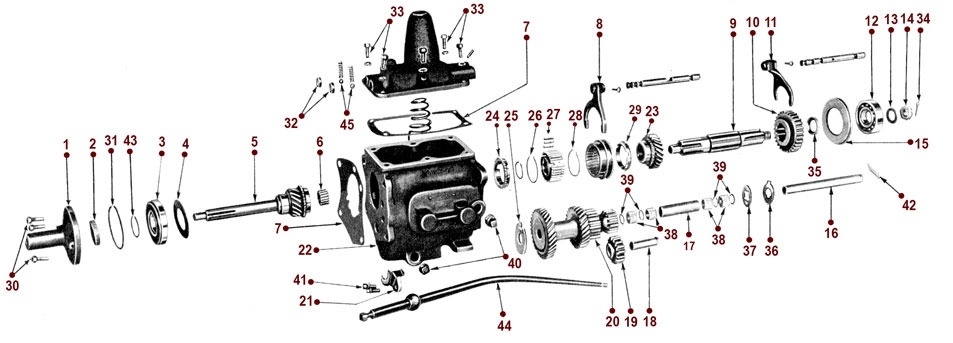
Looking for T-90 Transmission parts? Search T-90 Transmission by Category or by Diagram
Repair Procedures:
The following repair procedures given in Par. K-6 through K-9 for the standard 3-speed transmission apply in general to all models listed. Minor differences between models that affect the procedure are noted. Procedure for the optional 4-speed transmission begins with Par. K-11. Removal is as follows:
• Drain the transmission and transfer case. Replace the drain plugs.
• Remove the floor pan inspection plate.
• Remove the shift lever and shift housing assembly and its gasket from the transmission.
• Remove the set screw from the transfer case shift lever pivot pin. Remove the pivot pin, shift levers, and shift lever springs.
• If the vehicle is equipped with power take-off, remove the shift lever plate screws and lift out the lever.
• Disconnect the front and rear propeller shafts from the transfer case, following the procedure detailed in Section L. Should the vehicle be equipped with power take-off, disconnect the transfer case end of the power take-off drive shaft.
• Disconnect the speedometer cable at the transfer case.
• Disconnect the hand brake cable.
• Disconnect the clutch release cable at bellcrank yoke end.
• Place jacks under the transmission and engine, protecting the engine oil pan with a block of wood.
• Remove the nuts holding rear mounting to frame cross member.
• Remove the transfer case snubbing rubber bolt nut at cross member.
• Remove bolts holding frame center cross member to frame side rail and remove cross member.
• Remove bolts holding transmission to flywheel bellhousing.
• Force transmission to right to disengage clutch control lever tube ball joint.
• Lower jacks under engine and transmission. Slide transmission and transfer case assemblies toward rear of vehicle until the clutch shaft clears the flywheel housing.
• Lower jack under transmission. Remove transmission and transfer case as an assembly from under the vehicle.
• For separation of the transmission and transfer case, refer to Par. K-6.
Separating Transmission and Transfer Case:
• Remove the six screws and lockwashers attaching the transfer case rear cover and remove the cover. Or, should the vehicle be equipped with a power take-off, remove the power take-off shift unit which replaces the cover.
• Remove cotter pin, nut, and washer which hold the transfer case main drive gear on the rear end of the transmission mainshaft. If possible at this point, remove the main drive gear. If not possible, see steps d and e below.
• Remove the transmission-to-transfer-case screws.
• Separate the transfer case from the transmission. When separating the two units, use care that the transmission mainshaft bearing, which l bears in both housings, remains in the transmission housing. To separate the two units if the transfer case main drive gear was not removed in step b above, follow the procedure in step e below.
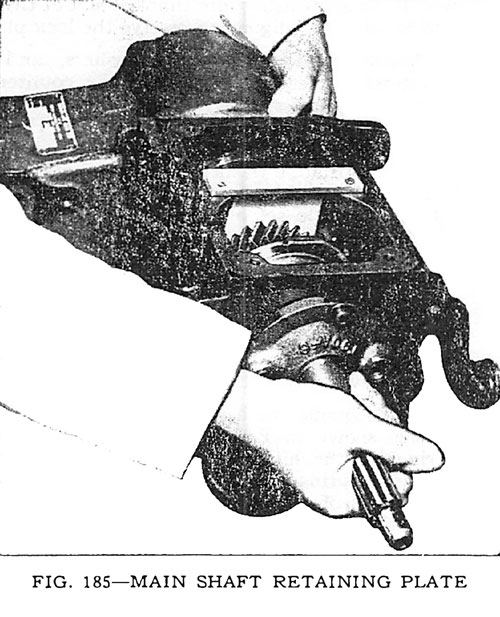
• Install transmission mainshaft retaining plate, tool W-194, as shown in Fig. 185 to prevent the mainshaft from pulling out of the transmission case. Should this tool be unavailable, loop a piece of wire around the mainshaft directly back of the mainshaft second-speed gear. Install the transmission shift housing right and left front attaching screws part way into the transmission case. Twist the wire and attach each end to one of the screws. Draw the wire tightly. With the mainshaft securely in place, support the transfer case and, with a rawhide mallet or brass drift and hammer, tap lightly on the end of the mainshaft to loosen the gear and separate the two units.
Transmission Assembly:
Assemble the unit in the reverse order of disassembly, noting the following points:
• Oil circulation is provided between the transmission and transfer case by the addition of drilled passages between the two units. The rear face of the transmission case is drilled with two 7/16" [11,11 mm.] holes and two 1/4" (6,35 mm.] holes. The front face of the transfer case is drilled with two 7/16" holes to register with those drilled in the transmission case. When making replacement of either unit or case, it is important that mating parts be installed, that is, if a transmission case is drilled use a drilled transfer case. It is important that the correct gasket, having openings for oil passage, be used with the drilled cases.
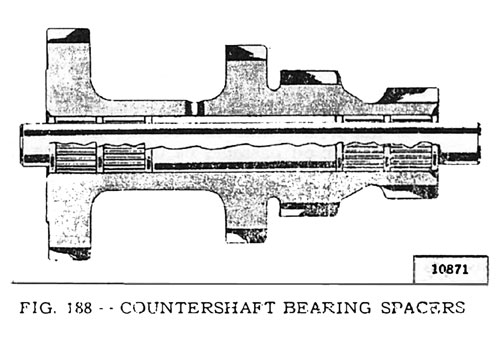
• On early Model CJ-3A, the countershaft gear assemblies included only four washers. No washers were installed at the ends of the center spacer. On later Model CJ-3A and other models listed above, a shorter spacer and two additional washers shown in Fig. 188 were used. When a transmission of the earlier type is disassembled, a change to the shorter center spacer and addition of the two washers upon reassembly is recommended.
• Position the reverse idler gear in the case and install the shaft using care that the slot at the shaft end is correctly aligned to receive the lock plate.
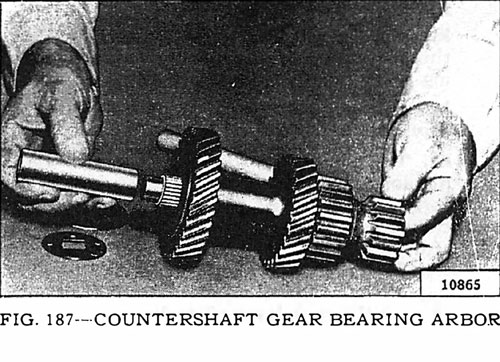
• Assemble the spacer, six washers, and four countershaft needle bearings in the countershaft gear hub, using special tool W-193 with loading sleeve, as shown in Fig. 187 and 191. Place the spacer inside the hub and insert the special tool in the spacer. Place a washer at each end of the spacer and load a set of bearing rollers at each end. Then add a washer, a set of bearing rollers, and finally another washer at each end to complete the assembly. Place the countershaft gear assembly in the case but do not install the countershaft until the mainshaft and main drive gear are installed.
• When assembling the mainshaft gears, the low and reverse sliding gear is installed with the shift shoe groove toward the front of the transmission.
• The sequence of assembly of the synchronizer unit is shown in Fig. 184. First install the two springs in the high and intermediate clutch hub with the spring tension opposed. Place the right lipped end of one spring in a slot of the hub and place the spring in the hub. Turn the hub around and make exactly the same installation with the other spring, starting with the same slot. Install the three synchronizer shifting plates in the three slots in the hub with the smooth side of the plates out. Hold the plates in position and slip the second and direct speed clutch sleeve over the hub with the long beveled edge toward the long part of the clutch hub. Install the two blocking rings one on each side of the hub. Install the completed assembly on the mainshaft with the beveled edge of the clutch sleeve toward the front end of the shaft.
• When installing the mainshaft, use care that the needle bearing rollers in the main drive gear are correctly positioned. Use heavy grease to hold them in position for assembly.
• The countershaft gear set, when assembled in the case, should have .012" to .018" [0,305 a 0,457 mm.] end play. This clearance is obtained by selective thickness of the rear steel thrust washer which is available in .0555" and .0625" [1,410 a 1,587 mm.] thickness. After installation of the front and rear bearing retainers on the mainshaft, turn the transmission over to allow the gears to mesh and also to permit alignment and installation of the countershaft.
• To install the countershaft gear set in the case, first install the large bronze thrust washer at the front of the case with the lip of the washer entered in the slot of the case. Use heavy grease to hold this washer in position. Next, install the steel thrust washer at the rear of the case. Start the countershaft into the case just enough to hold this washer in place. Align the slot in the countershaft with the slot in the reverse idler gear shaft to permit installation of the lock plate. Be sure the thrust washers are correctly positioned. Then position the bronze-faced washer against the rear end of the gear and place the gear in its running position. Tap the countershaft through the countershaft gear set and the case, forcing out the special tool.
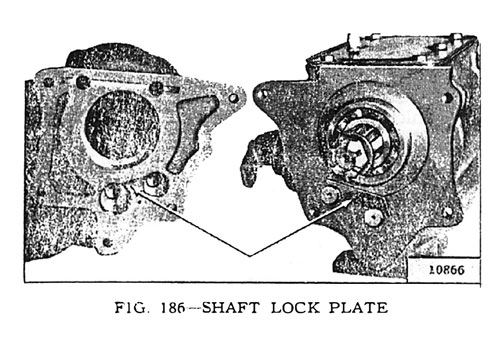
• Attach the transfer case to the transmission before the unit is installed in the vehicle. When doing this, use care that the countershaft and reverse idler shaft lock plate shown in Fig. 186 is correctly positioned in the recess in the transfer case housing. Three 1 1/8" long [29 mm.] screws and two 1" long [25 mm.] screws are used to attach the transfer case housing to the transmission housing. Install the 1" long screws in the lower left and lower right mounting holes. (K-9, p 168)
* Excerpt from the Service Manual for Universal Jeep Vehicles page 164-169
