Carter YF Servicing and Adjustment - CJ-5
Carter YF Carburetors:
The production model CJ-5 had the Carter YF-938SD carburetor superseding the earlier YF-938SC, YF-938SA, or YF-938S models. Note: Conversion kits for changing earlier models to SD models are available. See Par. F-27. It is recommended that when a carburetor is converted that a tag be fashioned stamped with the new model number and installed under one of the air horn screws. Look for such a tag to determine if the carburetor has previously been converted. Descriptions and repair procedures given in the following paragraphs apply equally to all YF-series carburetors. YF-series carburetors employ manual and vacuum control of the metering rod and accelerator pump. The carburetor controls and vaporizes the fuel through five separate circuits: float circuit, lowspeed circuit, high-speed circuit, choke circuit, and accelerating-pump circuit. A description of the function and operation of each circuit provides an over all description of the carburetor. For identification, the series designation is stamped on the body under the name Carter and the model designation is stamped on a flange protruding from the body. Note: When checking for carburetor icing causes, also check the vacuum-pump-to-manifold vacuum line connector.
Float Circuit:
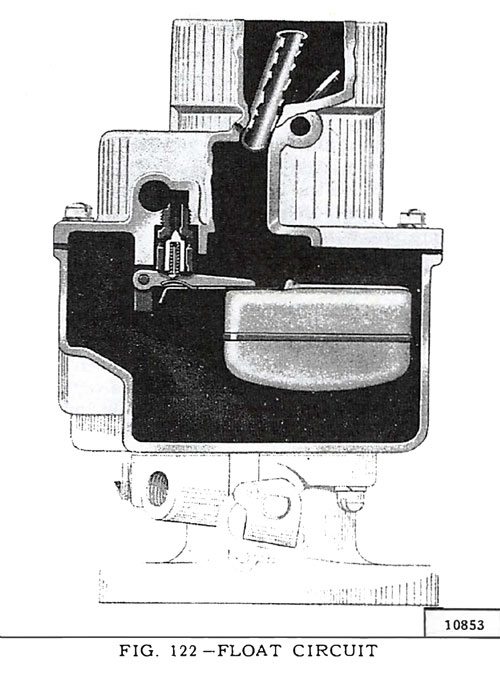
The float circuit, Fig. 122, consists of a float, float pin, air horn gasket and the needle and seat assembly. These parts control the fuel level in the carburetor bowl, a supply being maintained for all circuits under all operating conditions. To prevent float vibration from affecting the fuel level, the inlet or float valve is spring loaded. Should the needle and seat become worn, they must be replaced with a matched set, including the spring, which is the only way they are supplied. When reinstalling the float, be sure to install the float pin with the stop shoulder on the side away from the bore of the carburetor.
Float Adjustment:
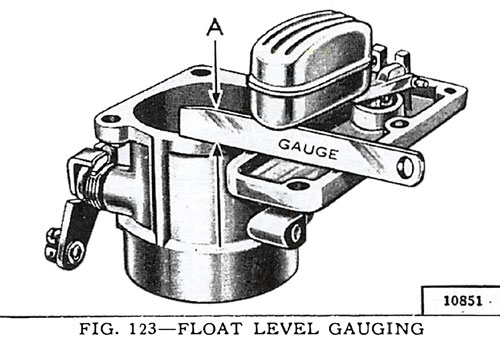
Correct float level setting is required for accurate metering of fuel in both low- and high-speed jets. To set the float, remove and invert the bowl cover. Remove the bowl cover gasket. Allow the weight of the float to rest on the needle and spring. Be sure there is no compression of the spring other than the weight of the float. Adjust the level by bending the float arm lip that contacts the needle (not the arm) to provide specified clearance between the float and cover. Specified Clearances: CJ-5 = 5/16" This clearance, shown as A in Fig. 123, can be measured by a gauge. Use these Carter gauges: CJ-5 = T109-107
Low-Speed Circuit:
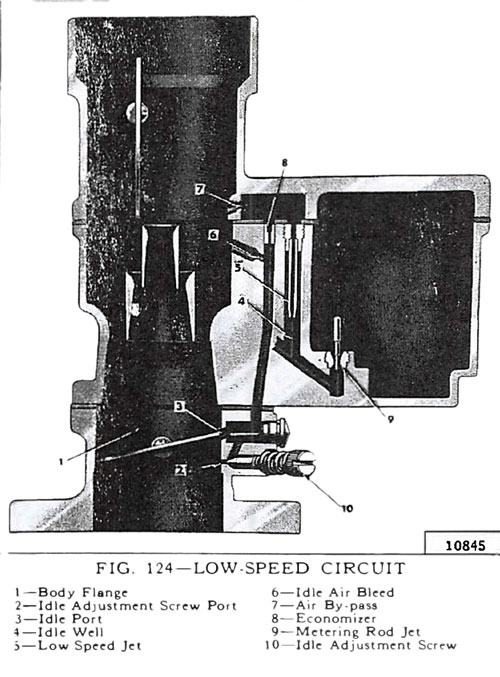
Fuel for the idle and early part-throttle operation is metered through the low-speed circuit. The low-speed circuit is illustrated in Fig. 124. Liquid fuel enters the idle well through the metering rod jet. Low-speed jet measures the amount of fuel for idle and early part-throttle operation. Air-by-pass, economizer, and idle air bleed are carefully calibrated orifices which server to break up the liquid fuel and mix it with air as it moves through the passage to the idle port and idle adjustment screw port.
Idle Adjustment:
Turn screw, Fig. 124, 3/4 to 1 3/4 turns for normal opening on the CJ-5. For richer mixture, turn this screw out; for leaner mixture, turn this screw in. Do not idle the engine below 600 rpm. By-pass, economizer, idle port, idle adjustment screw port, and bore of throttle body flange must be clean and free from carbon. Obstructions at any of these points will cause poor low-speed performance. A worn or damaged idle adjustment screw or low-speed jet should be replaced.
High-Speed Circuit:
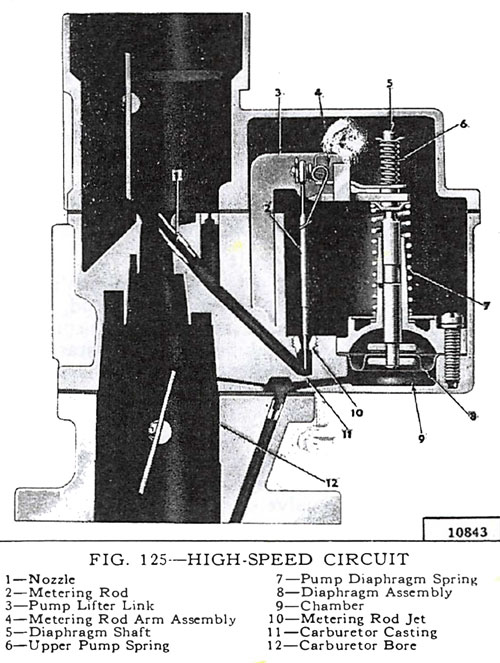
Fuel for part-throttle and full-throttle operation is supplied through the high-speed circuit shown in Fig. 125. A metering rod and metering rod jet control the amount of fuel admitted through the nozzle for high-speed operation. The lower end of the metering rod is calibrated in size to accurately meter the fuel required. As the rod is automatically raised and lowered in the jet, the opening in the jet is varied in size to supply fuel proportionate to the requirements through the higher speed and power range. The metering rod is both mechanically and vacuum controlled and is attached to the metering rod arm assembly. During part-throttle operation, vacuum in chamber pulls diaphragm down, holding metering arm assembly against pump lifter link. Movement of the metering rod is controlled by the pump lifter link which is attached to the carburetor throttle shaft. At all times vacuum in the chamber is strong enough to overcome the tension of pump diaphragm spring. Upper pump spring serves as a bumper upon deceleration and as a delayed action spring upon acceleration. Under any operating condition, when the pump diaphragm spring overcomes vacuum in the chamber, the metering rod will move toward the wide throttle (power) position. Note: Nozzle is pressed in and should not be removed.
Metering Rod Adjustment:
Check metering rod adjustment each time the carburetor is reassembled. Before adjustment is made, be sure that the flat of metering rod arm is parallel to the flat of pump lifter link as shown (Fig. 125.). With the throttle valve seated in carburetor bore, press down on the upper end of diaphragm shaft until the diaphragm bottoms in the vacuum chamber. The metering rod should now seat on casting with the metering ro:l arm flat against the pump lifter link. If the metering rod does not seat on the casting (check by pressing downward on metering rod) or seats before the metering rod arm makes flat contact with the pump lifter link, make adjustment by bending the lip on the metering rod arm.
Choke Circuit:
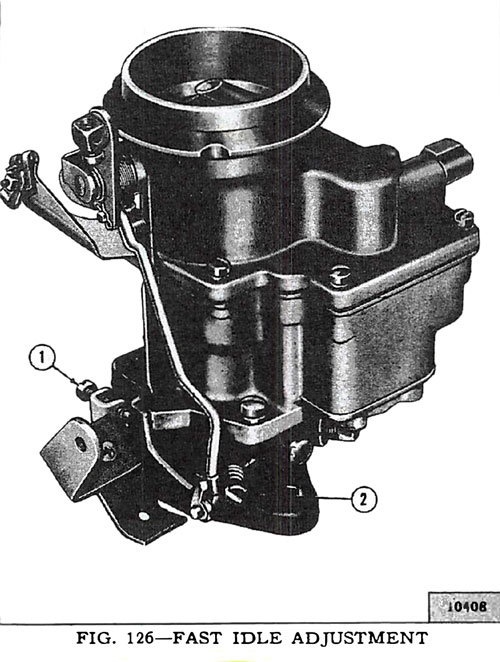
The choke circuit consists of a manually-operated choke valve, a fast-idle connecting rod, and a fastidle arm. The choke valve is offset-spring loaded to prevent over-choking during the starting warmup period. When the choke valve is moved to a closed position for starting, the fast idle connector rod A in Fig. 126 revolves the fast idle link B. This action increases the engine idle speed to prevent stalling during the warm-up period. A fast-idle connector rod return spring prevents partial closing of the choke valve.
Fast Idle Adjustment:
With the choke held in wide open position, lip A (Fig. 126) on the fast-idle rod should contact the boss on the body casting. Adjust by bending the fast-idle link at offset B.
Accelerating Pump Circuit:
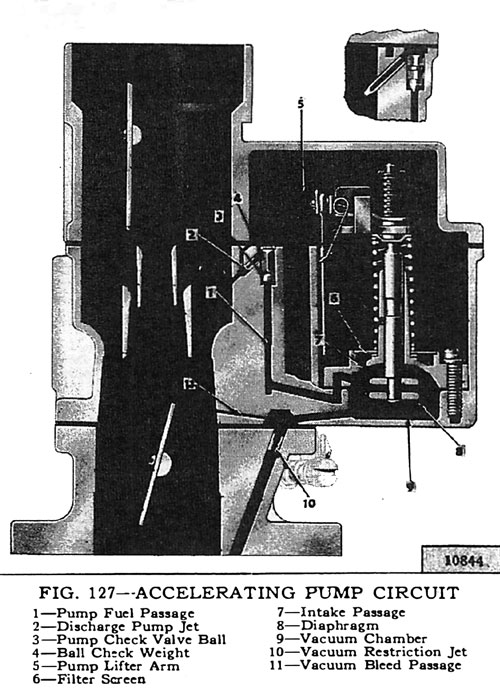
The accelerating pump circuit shown in Fig. 127 provides a measured amount of fuel for rapid acceleration and smooth engine operation when the throttle is opened at lower speeds. In operation, vacuum is applied to the underside of diaphragm at all times when the engine is running. Lower and more uniform vacuum is provided by vacuum restriction and vacuum bleed passage. When the diaphragm is in its maximum down position at low throttle resulting from high vacuum in chamber the chamber above the diaphragm is full of fuel which has been admitted through intake passage. When the throttle is opened, vacuum drops in the chamber and the diaphragm is initially forced upward by the spring on the diaphragm shaft. The upward motion is picked up by accelerator pump lifter which is connected to the throttle. This movement forces fuel from the chamber above the diaphragm through discharge pump check valve and discharge pump jet. This auxiliary discharge of fuel supplies engine requirements for quick acceleration and heavy loads. When the throttle is closed, the diaphragm is again pulled down by high vacuum and another measured charge of fuel enters the chamber above the diaphragm through the intake passage to be available for the next cycle of operation. Note: The pump jet (see insert drawing in Fig. 127) projecting into the air stream is permanently pressed into the carburetor body and should not be removed. Also, carburetor design makes it impossible to adjust the pump stroke.
Looking for Fuel parts for your vintage Willys or Jeep? Search Fuel by Category or by Diagram
* Excerpt from the Service Manual for Universal Jeep Vehicles pages 98-100
